Yesterday on Twitter the inimitable Morten Just posted a preview of a tool he’s created that wrap ffmpeg to allow movies, such screen recordings but pretty much anything, to be re-encoded to a smaller filesize.
I responded with a trick I use to do the same on “right-click” context menu using a macOS app called ContextMenu, and others said it was possible to do it using Automator (with some caveats). In this blog post I’ll compare the two.
But first… let’s talk about how we will make this work.
Processing files through shell scripts
We’ll be making use of command line tools to do the heavy lifting, but don’t worry I’ll show that this can be as simple as a single-line command to process a single file, or a shell scripts of a few lines to process multiple files.
Single files
The one-line command to convert a video or audio file can be as simple as the following:
/opt/homebrew/bin/ffmpeg -i "$@" "${@%.*}.mp4"
There are some assumptions here:
-
ffmpeghas been installed usingbrew - my Mac is Apple silicon, so
brewinstalls commands to/opt/homebrew/bin/ - (older Intel Macs will have them installed to
/usr/local/bin/) - the script is called with parameters passed by
argvso the file is$@ - the new file will have the same name as the original, but with a new .mp4 file extension
- it only works on single files (read on)
We could add an extra parameter to the command line to use hardware encoding (hevc_videotoolbox) -c:v hevc_videotoolbox, which would be something like twice as fast, but this will not reduce the file size. So we stick with ffmpeg default settings.
You can take the exact same approach with any destination format as it is decided by the file extension. Cool. You could convert any of ffmpeg’s supported file types to any other, such as WAV, OGG, MKV, etc.
And as we’ll see later we can take this simple command and change it to use other command line tools to compress GIFs, with or without upscaling, and many other timesaving tasks. Powerful stuff!
Multiple files
To extend this approach for multiple files you can use the following for loop:
for f in "$@"
do
    /opt/homebrew/bin/ffmpeg -i "$f" "${f%.*}.mp4"
done
Multiple files in parallel
And to process those multiple files in parallel (be careful not to overwhelm your computer!) we can background each execution using the & symbol.
for f in "$@"
do
    /opt/homebrew/bin/ffmpeg -i "$f" "${f%.*}.mp4" &
done
Automator
This has been a built-in macOS app since 2005. Setup is relatively straightforward:
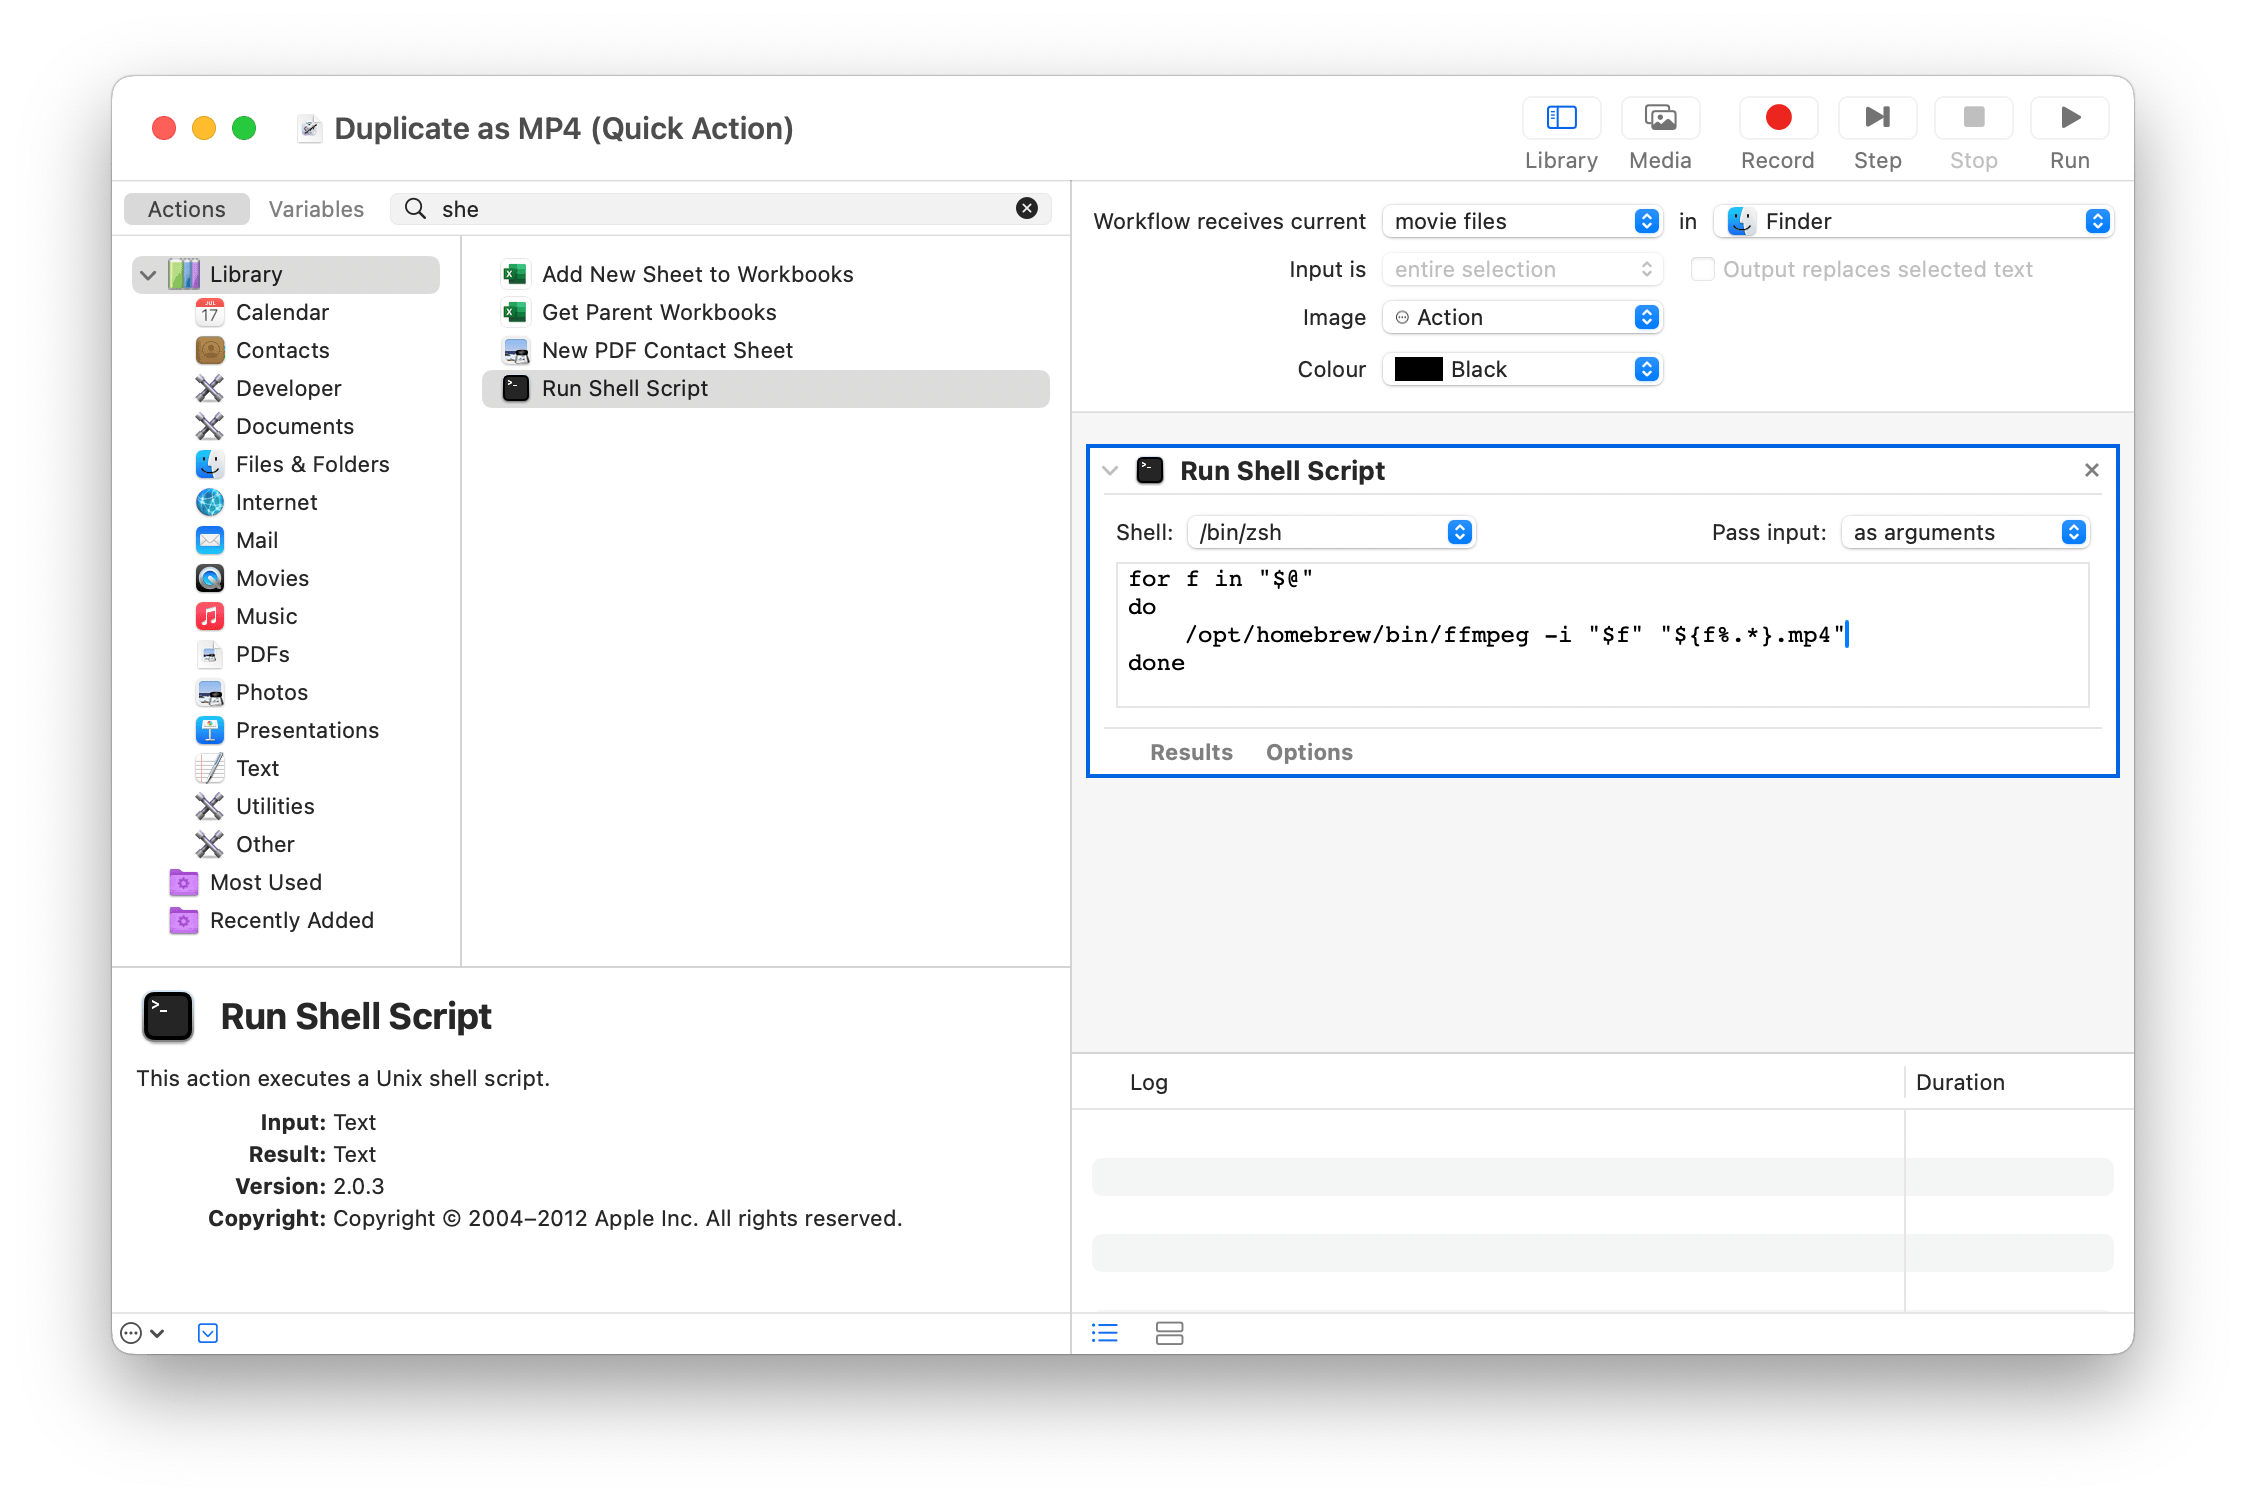
- Create a new Quick Action workflow
- Workflow receives current: movie files
- in: Finder
- Add a new action of type action Run Shell Script (search for it in the sidebar)
- Pass input: as arguments (this will give us a template command)
- Replace the echo line with your command
- Save, name it “Duplicate as MP4”
The menu item is now available on the context menu, inside the Quick Actions submenu. After repeated use I find this submenu too annoying, but you may fare better.

So, pretty easy! But, there are some caveats or limitations that may, or may not, annoy you. Perhaps we don’t want the menu item to appear for such a broad range of files (all “movie files”), or maybe we want it to appear for multiple types of files (both “audio files” and “movie files”). Sadly this is not so easy with Automator.
Automator stores these files at ~/Library/Services/ and they will migrate to a new Mac.
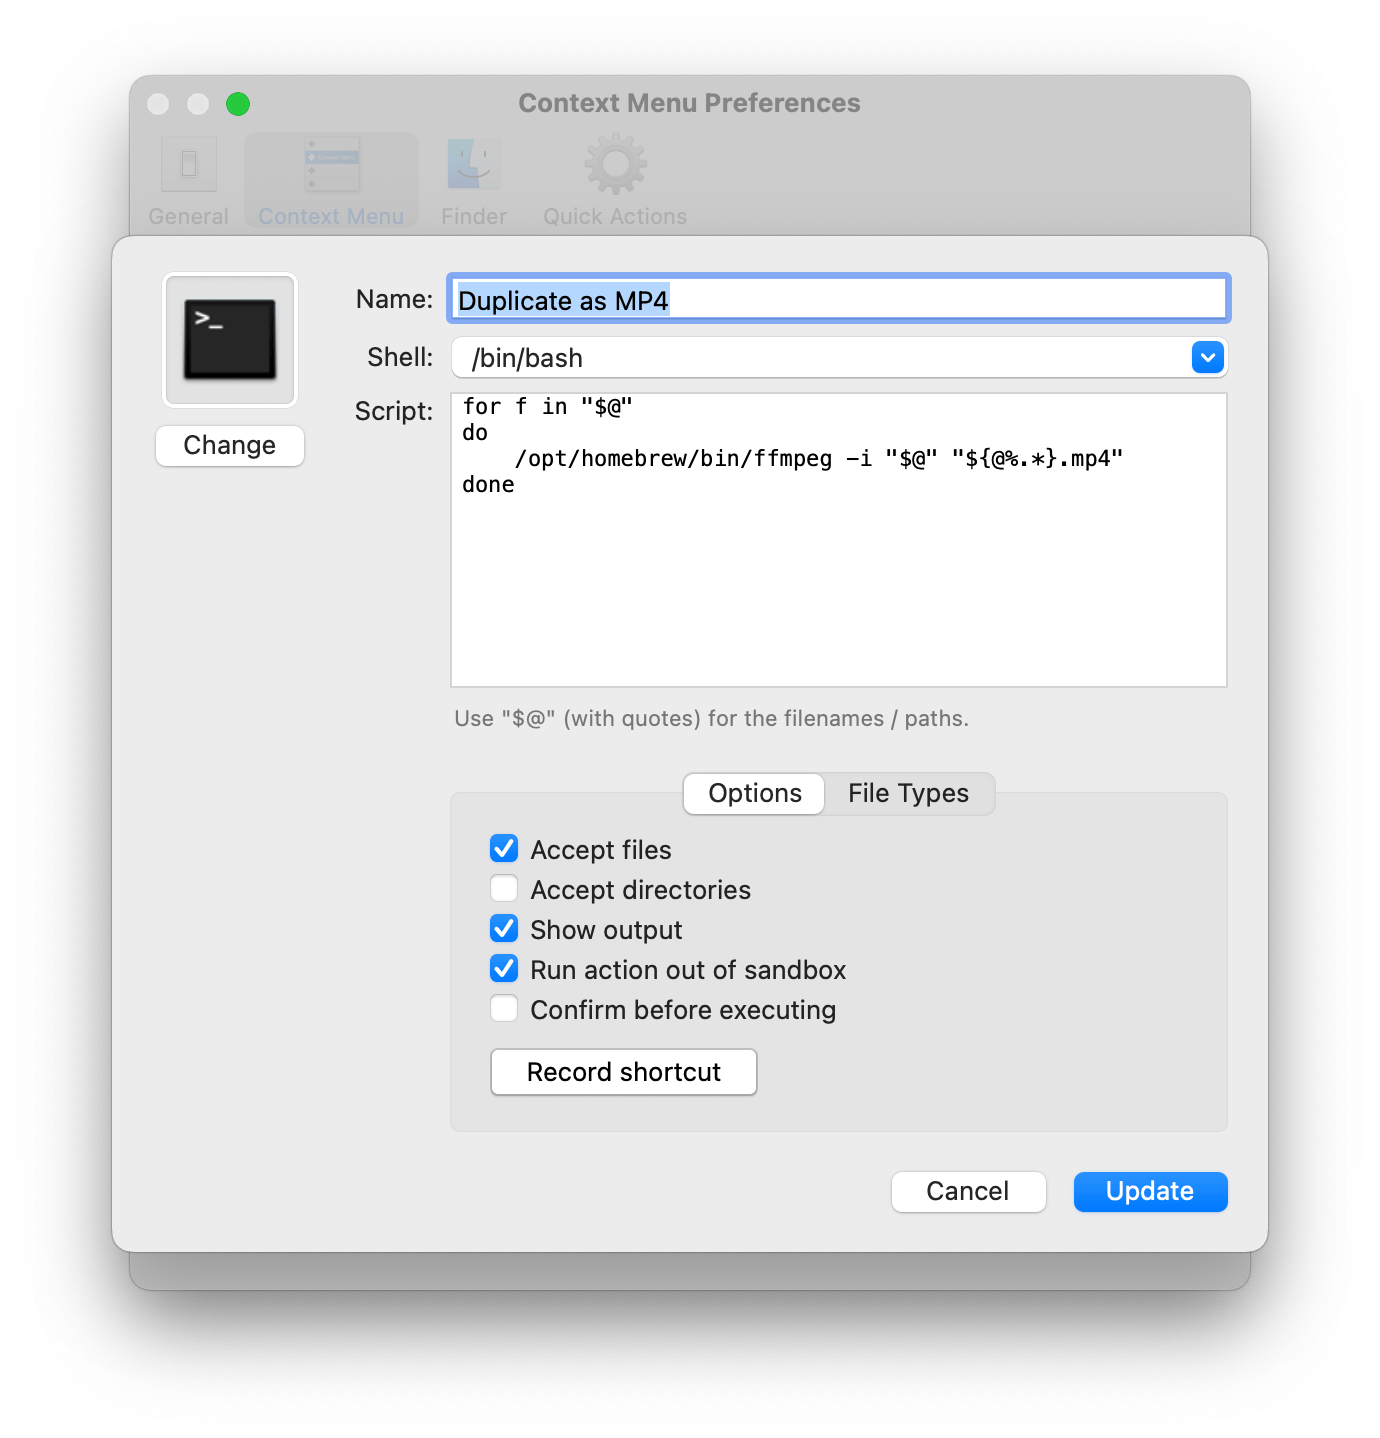
ContextMenu
Many years ago I found ContextMenu ($4.99) which solves all of the issues I have with the Automator approach. There’s also a free version, ContextMenu Lite, that supports up to 3 actions to give you a taste of the good stuff.
- Submenu is optional
- Apply to multiple types (files or directories; can be as granular as file extension)
- Show output (sometimes you want to see the results of the command)
- Confirmation before running (if it’s a potentially dangerous operation)
The menu item displays in Finder as follows:

ContextMenu stores these files in its own group folder, right click an action and choose Show in Finder, but you can specify your own folder in a location of your choice. Both will migrate to a new Mac, but the later might give you more control.
Edit: we can limit actions to running on files with specific extensions or, since update 1.4.4 specific UTI types.
Compressing a GIF
We can use the gifsicle command line tool to optimise (compress) an Animated GIF. The a parameters I use here are explained in the gifsicle man page, and I arrived at them with years of experimentation.
/opt/homebrew/bin/gifsicle -O1 -Okeep-empty --careful "$@" > "${@%.gif}.o.gif"
We can also do the same thing whilst scaling it up by a factor of 2:
/opt/homebrew/bin/gifsicle -O1 -Okeep-empty --careful --scale 2 "$@" > "${@%.gif}.o.gif"
Repository of ContextMenu Actions
Here’s my repo of shared actions. Inside each .cmaction file is a main.sh file which contains the command that you can use in Automator if you’d like.
These include many useful commands such as:
- Convert BIN+CUE to ISO
- Change sample rate of audio
- Convert image to 1-bit
- Convert image format
- Create Clean ZIP
- Duplicate audio as alternative format
- Duplicate image as alternative format
- Duplicate movie as alternative format
- File information
- Generate images for web
- Make script executable
- Move file (includes helper app)
- New file with clipboard
- Open file with specific apps
- Optimize GIF
- Set GIF to loop infinitely
- Show GIF info
- Playdate Colorize IMG
- Replace Existing App (warning)
- Scale image to certain percentage
- Set as MacJapanese encoding
- Show hashes (includes helper app)
- Stub out file (warning)
- Touch file
Originally published: 2024-07-30
--
Found this helpful? Consider buying me a coffee.
--
Comments: @gingerbeardman