I’ve started work on the next in my 1-bit Woodblocks series: “Tekagami” (Ito Shinsui’s “Hand Mirror”). So it’s a good time to talk about how I turned an iPad Pro into the ultimate Classic Macintosh.

Emulators
Both Macintosh emulators available on iOS we’re ported by @maczydeco who has done an amazing job making them feel truly at home on iOS. Many thanks! They need to be built from source using Xcode but it’s a pretty straight forward process.
Mini vMac
- Supports System 1.1 to 7.5.5
- Limited RAM and CPU emulation
- File Sharing via bespoke method
- No dynamic screen resolution changing
- Odd interface using Control key shortcuts
- Source code
BasiliskII
- Supports System 7.0 to 8.1
- Advanced RAM and CPU emulation
- File Sharing via mapped folder
- Dynamic screen resolutions through Monitors control panel, or automation
- Native iOS interface for settings panel, negating all the issues with the desktop GUI
- We have a winner!
-
Source code (use the
iosbranch)
File Sharing
This works a treat in both emulators, but the experience is better in BasiliskII.
With Mini vMac you need to run a special file import app, and then whilst it’s open use iOS Share Sheet to send a file to Mini vMac. These extra steps are just enough friction to make the emulator annoying to use.
With BasiliskII things are easier as it has a drive mapped to the app’s file sharing folder. You can use the Share Sheet in the same way as Mini vMac, but you can also simply copy/move a file to the BasiliskII folder and it will be accessible inside the emulator. The only gotcha with this approach is that you’re best moving the file to the emulated system’s main disk drive otherwise you’ll encounter various oddities with certain apps that don’t know how to cope with files located on this type of drive.
Screen Resolutions
The original Macintosh had a native screen resolution of 512×342.
Conceptually, the iPad has a logical screen resolution of 1024×768, which when running in pixel doubled mode equates to 512×384. A pretty good match. Specifically, the native resolution varies according to the model of iPad or iPhone you are using.
I use an iPad Pro 12.9” which has a native resolution of 2732×2048, pixel doubled that means 1366×1024, and pixel quadrupled 683×512. Targeting this ballpark of resolution means user interface elements will be around the magic 44pt tappable area, so that fingertip interactions are accurate, predictable and enjoyable.
Of course the iPad can flip between landscape and portrait orientations on demand, which means BasiliskII supporting the Monitors control panel is a big win.
So I added a bunch of custom resolutions to the BasiliskII soure code to add support for both pixel-doubled and pixel-quadrupled resolutions, in both portrait and landscape, with and without room for the software keyboard. I can switch between these resolutions with keyboard shortcuts. Which leads nicely on to…
Custom Keyboards
Both emulators share the same software keyboard mechanism. The keyboard layouts are user-editable as JSON and compiled into a custom format.
So I put together a custom keyboard layout that can be used in either emulator that gives me quick thumb access to tools and shortcuts in my most used apps: artWORKS and UltraPaint. It works for both apps as they are closely related, sharing a lot of code and resources.
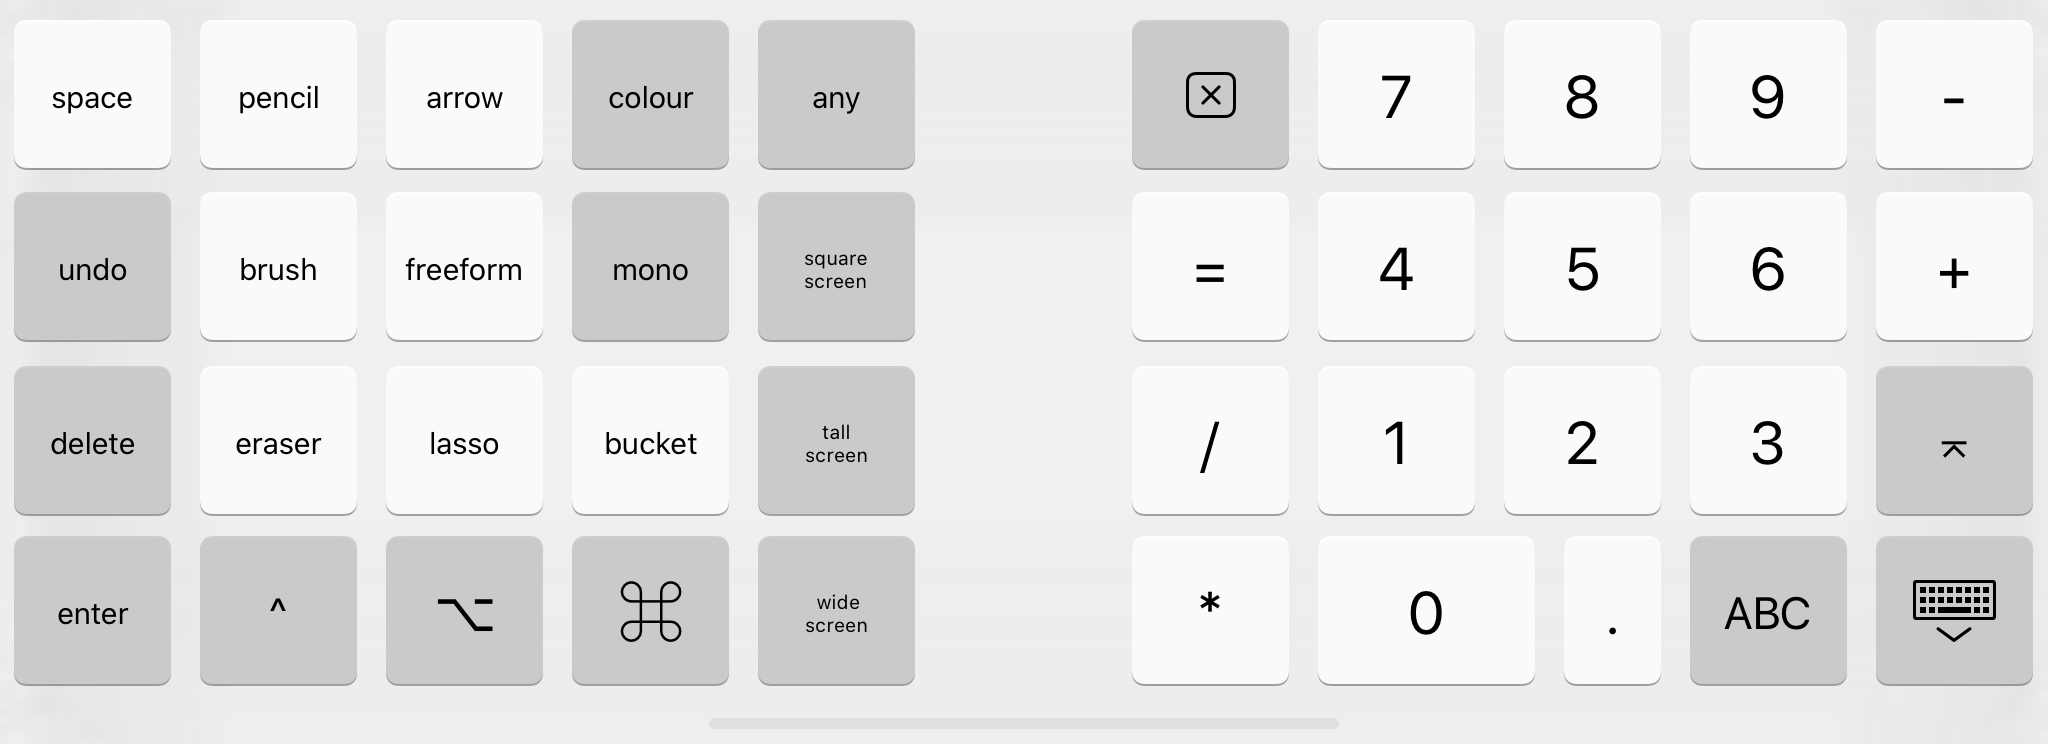
With this keyboard layout I’m not only relabelling the function keys, but also replacing some key codes to reposition keys for my own purposes. The apps don’t respond to function keys so I use macros and Apple Events to get things to work as detailed in another post.
How does the experience compare to a real Macintosh?
The most important aspect of this setup is that it runs System 7 and the various apps I use. That is the core of my classic Macintosh experience and the goal I had in mind. The hardware running System 7 is merely a conduit.
That said, the iPad Pro is more portable, reliable and capable than my real Macintosh. That’s 30 years of hardware progress for you.
The iPad’s display in particular is a huge differentiator—it can assume so many different resolutions it should be thought of as a collection of displays rather than just a single one.
Apple Pencil is very similar in feel to my Wacom ArtPad II, but with the single huge improvement that you’re drawing directly on the screen. Drawing with an Apple Pencil on System 7 is every bit as good as drawing in a native iPad app.
iOS is only a swipe away: download classic software using a modern web browser like Safari, expand archives more quickly with Files or Documents, watch videos picture-in-picture, search your Inside Macintosh PDFs in Books, listen to streaming music, and so many other things that aren’t doable (or at least are extremely difficult to do) on a real classic Macintosh.
Bluetooth keyboards just work. The new/recent mouse pointer support in iOS also works. You could even plug the iPad into an external display to go full circle back to a desktop computer.
This setup gives me the best of both old and new worlds, and that’s why I refer to it as the Ultimate Classic Macintosh.
Related posts
- Turning an iPad Pro into the Ultimate Classic Macintosh
- How to install BasiliskII on your iPad
- Exploring Custom Keyboards and Automation
- Optimising Macintosh app toolbars for touch
- Macintosh drawing software compared
- Mixing External Tools across Deneba software
- My System 7 software choices
- About the interoperability of System 7 and iOS
Elsewhere
- 2021-03-29—The Mac Observer
- 2021-04-18—Hacker News
- 2021-04-19—Boing Boing
- 2021-04-19—iDownloadBlog
- 2021-04-19—The Loop
- 2021-04-22—FredZone (in French)
- 2021-04-23—Gizmodo
- 2021-04-23—Pixel Envy
- 2021-04-26—iGeneration (in French)
Originally published: 2021-04-17
--
Help keep this blog running with a coffee donation!
--
Comments: @gingerbeardman