First, a little bit of Macintosh History. You probably know that on modern macOS you can select a file in Finder, on your Desktop, or in an app, and send it to the Trash by choosing the Move to Trash menu item, or by pressing Cmd+Backspace/Delete. This keyboard shortcut was added in System 7.5.3 where it was largely unadvertised and somewhat of a secret feature, but quickly became indispensable for those who knew. Of course, these days it is proudly displayed in macOS Finder menu.
Fast forward to today, when James Wages asked about a good way to do this on System 7.1, and posed a partial solution along with a challenge. But we’ll get to that in a moment. Since I regularly use System 7 on my iPad Pro I’d also missed this function and had come up with a few different workarounds to map Move to Trash to Cmd+Backspace/Delete.
KeyQuencer
The first workaround was to script a KeyQuencer macro to simulate the mouse drag of the selected item to the trash can. This relied on you positioning the mouse pointer over the selected file and also making sure the Trash icon was always in the required position on screen. It worked, but it was less than ideal because it was far too fragile. I’ll leave reproducing this as an excercise for the reader.
KeyQuencer is one of my favourite and most used classic Macintosh apps, written by prolific Italian developer Alessandro Levi Montalcini who is still developing useful things today! Anyway, it could be used for a wide variety of macro and automation purposes. It was very versatile as it contained its own scripting language and a dictionary of functions that touched most aspects of System 7. I use it to map all sorts of esoteric functions to hotkeys, like changing screen resolutions and colour depth, or performing complicated multi-step tasks on a single key stroke. An equivalent for modern macOS is Keyboard Maestro, which is no doubt more capable but also more difficult to use.
FinderHack
So, James mentioned FinderHack which is a system Extension that gave earlier versions of System 7 a similar set of Finder features to those introduced in 7.5.3. But, crucially, it mapped the Move to Trash hotkey to Cmd+T, which is different enough to become annoying as you can no longer rely on muscle memory. The challenge: how can we map this to the modern Cmd+Backspace/Delete shortcut?
So, I turned to KeyQuencer once again and created a short macro which would type the Cmd+T key combination and I assigned it to Cmd+Backspace/Delete. It worked! Pressing my hotkey typed the FinderHack hotkey.

So we already have a good solution but resources are often scarce on classic Macintosh, so I wondered if I might be able to cut out the middleman and change the keyboard shortcut by modifying FinderHack directly. James had noticed that ResEdit would not allow you to type the Backspace character. I confirmed the same was true in Resorcerer. So, what to do?
HexEdit
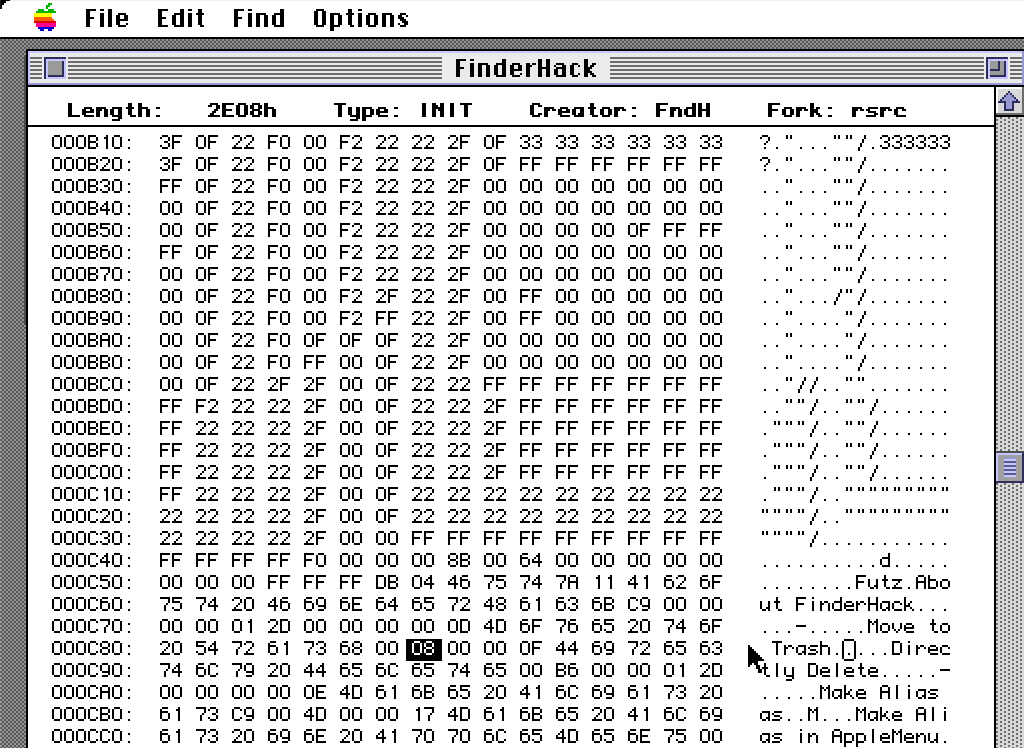
Opening FinderHack directly in HexEdit we can scroll down a little to find the menu definitions, find “Move to Trash” and can change the following hex value from 54 (“T”) to 08 (“Backspace/Delete”), those being ASCII values, and reminding ourselves that the Backspace/Delete key is different than Forward Delete key on some Apple keyboards that have both.

The final modified file is up over at Macintosh Garden: macintoshgarden.org/apps/finderhack

Removing the confirmation alert
I used a disassembler to figure out the code that was responsible for showing the confirmation alert that appears after pressing the hotkey, but I wasn’t sure how best to remove it. So I asked on 68KMLA.org and user cheesestraws came up with a solution (thanks!) that involved NOPing out the Alert syscall setup, invokation, and return, and making the comparison that usually checks the alert button always default to the OK. I was so close to figuring out this solution myself, but I lacked a key bit of knowledge for how to figure out the hex code for a totally new instruction. Well, now I know how to do that! Here’s all the details of how to change the machine code. I could have and probablt should have used Ghidra to figure out this edit to the code.
Once this was done it became obvious how much of a hack FinderHack really is. After deleting the file the icon of the now missing file persists in Finder for up to a few seconds on my emulated Mac, and up to 20 seconds on period hardware! This is unacceptable, so I had to go deeper.
KeyQuencer, Redux
I went back to old faithful, KeyQuencer, to see if there was a way I could force Finder to refresh the icon more quickly. Whilst I was reading the docs I saw the following:
What Is KeyQuencer?

KeyQuencer is a utility that lets you create shortcuts, called macros, that
perform a series of tasks with a single keystroke. A macro is a set of
instructions that KeyQuencer uses to perform a task on a computer, for
example you can use KeyQuencer macros to:

   * Apply shortcuts directly to the current Finder selection, like moving
     items to the Trash.
Well! It turns out KeyQuencer could have solved our problem from day one! Lesson learned: RTFM.
So, how do we go about setting up KeyQuencer to enable this feature? Well, before we get to that let’s talk about how KeyQuencer does its thing. It consists of three main parts:
- KeyQuencer Engine
- one or more KeyQuencer Extensions
- KeyQuencer Panel and/or KeyQuencer Editor
- one or more KeyQuencer Macros
The beating heart of KeyQuencer is the KeyQuencer Engine system extension that lives in the usual System/Extensions folder, along with a folder in System called KeyQuencer Extensions that contains KeyQuencer’s own type of extensions. Still with me?
Inside the KeyQuencer Extensions folder you put any KeyQuencer Extension files that you want to use, by copying them from the KeyQuencer installation folder. This was a method to keep memory usage low by only loading the functions you’re using rather than the whole suite. So if you’re using a function from the File category, you copy the “File” KeyQuencer Extension in there.
Once all that is set up you can create/add KeyQuencer Macros, using either KeyQuencer Panel or KeyQuencer Editor. There are lots of sample macros included with the app to get you started, and many were made and shared by the community. The app also includes detailed command help so you know exactly what is possible and how to make it so. Eventually you can construct your own macro, which is what I’ll do here.
Step by step: words
- Download KeyQuencer 2.5.6 which gives us a folder called
KeyQuencer 2.5.6 99/07/18and copy the following files to their destinations:-
KeyQuencer Enginegoes inSystem/Extensions -
KeyQuencer Panelgoes inSystem/Control Panels -
KeyQuencer Extensions/Archive and Files/Filegoes inSystem/KeyQuencer Extensions(create the destination folder)
-
- Install AppleScript 1.1 Finder Scripting Software (this is the updated Scriptable Finder 7.1.3 and Finder Scripting Extension)
- Restart the Macintosh when prompted
- Create the Macro (you could also copy and paste it from a sample macro file):
- Open KeyQuencer Panel control panel
- Inside the panel choose File > New Macro
- Give the macro a name: “Move to Trash”
- Give the macro a hotkey: Cmd+Backspace/Delete
- Enter the macro script:
File move selected to trash enforceby pasting, typing, or using the gui - Click OK
- Select some files and press Cmd+Backspace/Delete to move them to the trash!
Step by step: video
Here’s a screen recording of me doing the above on a fresh System 7.1:
Originally published: 2024-04-12
--
Want to see more content like this? Buy me a coffee!
--
Comments: @gingerbeardman